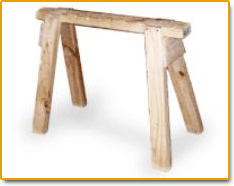
SAW STOOL
-Housings
-Logs
* how to fit into housing?
1st i marked out the parts of my top piece of wood to house my legs in, then i started chiseling it out. I used my craft knife, chisel, hammer, and square to check out if my housings that i was chiseling out was accurate and flat and made sure that my housings weren't sticking out.
*how to fix (NAIL)?
when your nail comes out of the wood simply hit the other side or conter sink your nails.
*what steps were there cutting the legs to size?
1st i marked out the angles and the parts i was going to cut off. the angles were already made for us so we only had to work to one angle. after cutting my angle i planed my legs. i put the legs onto the housings and i had to use my square to check if my legs were straight and if they wern't then i planed the legs to size. i didn't plane all the way to the end because it would chip and wreck the ends of my wood.
-Cleats
*how did we mark out?
The cleats were marked out by placing the cleats on both of the legs and marking out the shape on the outside of the legs onto the cleats.
*how to get it nice and tight?
to get your work nice and tight to have to make sure your housings and parts fit in perfectly.. always make sure that your housings have no bumps in the middle.
*tricks in planing?
never ever plane all the way through the piece of wood. always make sure your plane is sharp and try practicing on some off cuts before planing your own work.
-Braces
*how to mark out?
1st you grab a 100 x 25. and mark 50mm up from both ends of the wood and mark it, then connect the two markings by drawing a line.
*what was tricky?
chiseling out was tricky because i had to chisel out on an angle.
*witch tools did you use?
*HAMMER
*CHISEL
*PENCIL
*SQUARE
*PLANE.
carpentry

Monday, 28 March 2011

Monday, 21 March 2011
21/03/2011
Yesterday we worked on our saw stools. i have finished my saw stool but i just need to sand it down and sand of all my pencil marking's. Yesterday we also learnt how to use a Dumpy Level. we learnt how to set it up and how to adjust the dumpy level so its square and learnt that we always had to check the spirit level was accurate and dead centre. The dumpy level had adjustable head and feet. it also had a lens and focus/zoom and dial and a tripod.
PARTS OF A DUMPY LEVEL

Wednesday, 16 March 2011
16/03/2011 wednesday
On Wednesday ii just about finished my saw stool. I only have my last CLEAT to do and my BRACE. it was really cool making the saw stool. i only started on Monday, knowing that it only took me about three days to create something i thought would take weeks to finish really felt good. I think my hand skills and my knowledge about the carpentry industry has really changed. i can certainly see a better future in carpentry for myself and my family. I have learnt how to chisel better, how to cut in a straight line, how to let the tool do the work, (WORK SMARTER NOT HARDER) and i have also learnt to always follow the plan.
Monday, 14 March 2011

Steps to how to biuld a fence
- Lay out a line where the fence is to be installed. Usually this will be along the property line, so be careful it doesn't encroach on your neighbor's property, or you will be relocating it later.
2 - Determine the height the fence should be to meet your needs. Six foot is normal for a privacy fence, a live stock fence four feet high is usually sufficient, and picket fences are often three feet high.
- 3Set your "end posts". These are the posts located at either end or any corners along the fence.
- Use "post hole diggers" to dig the holes.
- Dig your post holes deep enough to support the fence structure. Because soil conditions vary, and the height of the fence, the type of fencing, and other factors must be considered in determining how deep the post should be, we will use 30 inches as a median depth for the post holes.
 Place the end posts in the holes, and fill in around the posts with dirt or cement, packing it as you do. Check the post for "plumb" before they are completely filled and packed, and adjust as needed.
- 4Pull a builder's line from one end post to the other, at an equal height above the ground. This will allow you to dig the intermediate holes in alignment with the fence, and give you a depth so that the posts will all be the same height.
- 5Lay out the post holes between the end posts eight feet center to center, and dig the rest of your holes.
- 6Set the remaining posts, measuring the same distance from the top of each one to the building line, and plumbing them as you go.
- 7Pack the backfill around all of the posts firmly.
- 8For a privacy fence, nail a 2X4 board (stringers) with 12 or 16d galvanized nails, from post to post along your fence line at the top, the center, and about a foot from the bottom of each post.
- 9Nail the vertical boards, usually 1X6 rough sawn lumber, leaving a space between each board to each of the stringers with 8d spiral shanked galvanized nails.
- 10Paint the finished fence with a good quality waterproofing sealer. This will usually either contain silicone solids, or linseed oil. If you plan on painting a finish paint, stick with an oil based sealer, and use an oil based polyurethane paint or exterior enamel for the finish paint.

Subscribe to:
Posts (Atom)